00 · Getting started & orientation
This chapter gets you signed in and oriented: how to log in securely, how the app is laid out, and the handful of screens you will return to every day. If you read only one chapter first, read this one.
What VendorBenchmark is for. It helps you buy software at the right price: upload vendor proposals for expert benchmarking, run instant price checks, track your agreements and renewals, and work negotiations to a close. Everything else in this manual is a specific way of doing one of those four things.
Signing in
Where: /login
Who: everyone
You sign in with your work email. Two methods are available:
How to use it
- Go to the sign-in page and enter your work email.
- Either type your password, or choose Email me a link to get a one-time magic link instead of a password.
- If your organization requires two-factor authentication (always on for accounts with elevated access), you will be asked for a six-digit code from your authenticator app next.
Tips
- Invited by a teammate? Your invite email links to
/signup, where you set your name and password once, then land in your organization already set up. - Forgot your password? Use Reset password on the sign-in page; you will get a link to set a new one.
Two-factor authentication
Where: /mfa (challenge) · set up under Settings › Security
Who: everyone (required for elevated access)
After your password, a two-factor challenge asks for a rotating six-digit code from an authenticator app (Google Authenticator, 1Password, Authy, and the like). This protects your account even if your password leaks. You turn it on and register your device in Settings › Security.
The app shell
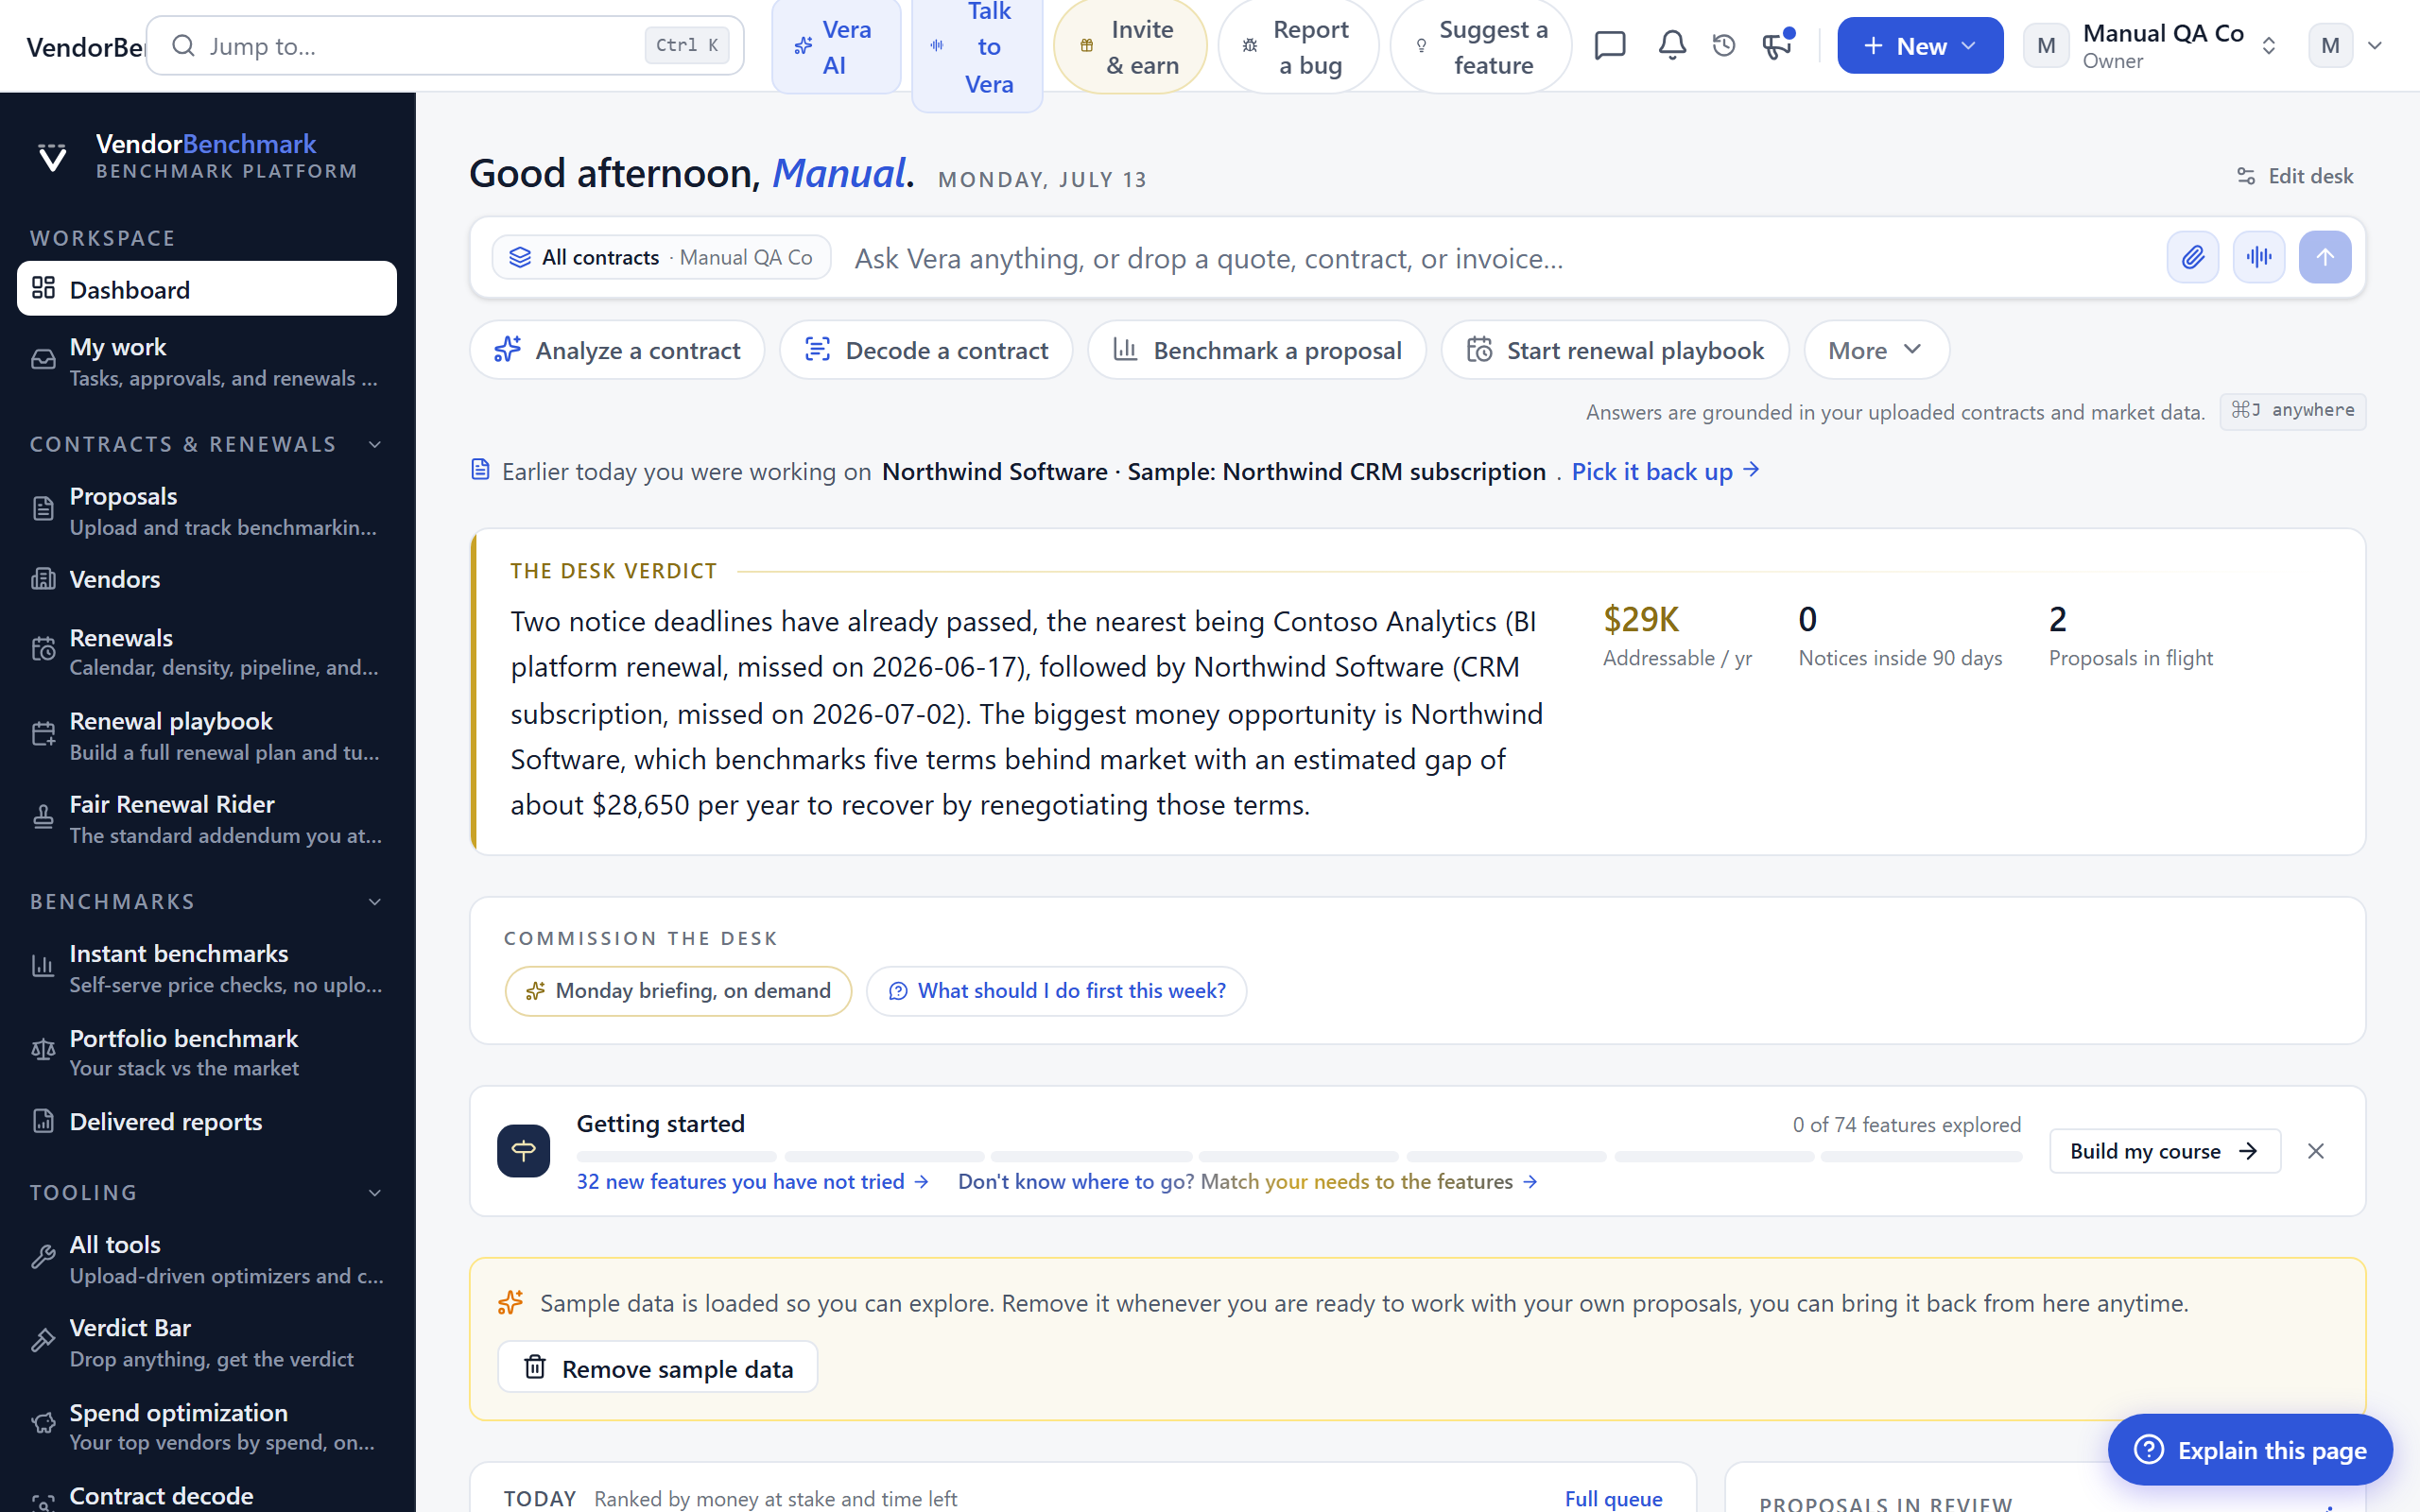
Every screen shares the same frame: a dark navigation rail on the left, a white utility bar across the top, and your content in the middle.
The left rail
The rail is your main map of the product. It groups destinations by what you are doing:
- Contracts & renewals — everything about the paper: proposals, agreements, renewals, negotiations.
- Benchmarks — price checks and delivered reports.
- Tooling — upload-driven optimizers and the vendor playbooks.
- Insight — analytics, opportunities, and the community layer.
- Team & AI — tasks, approvals, and Vera, the AI analyst.
On the screen
- Group headers — click one to fold or unfold it. Your folds are remembered per device. When you first pick a role in the getting-started course, the rail opens the groups that match how you work.
- Core vs full rail — by default the rail shows the handful of destinations most people use weekly. The rest live in the More catalog and the command palette, so the rail stays short. You can switch to the full rail from the control at the foot of the rail.
- Workspace summary (foot of rail) — your organization and your role are always shown here, so you know which tenant you are in.
- Collapse button — narrows the rail to icons only when you want more room.
The top bar
On the screen
- Breadcrumb — shows where you are (VendorBenchmark › current view).
- Add to dashboard — on any feature page, this button pins the page to your dashboard shortcuts. Click it once and the page appears in a Your shortcuts band on your dashboard; click it again (it reads On dashboard) to remove it. Your shortcuts are personal and do not affect the rest of your team.
- Jump to… (Ctrl/⌘ K) — the command palette. Start typing any page, tool, or vendor and jump straight to it. This is the fastest way to move around; you rarely need to hunt in the rail.
- Ask AI (Ctrl/⌘ J) — opens Vera, the AI analyst, over whatever you are looking at, without leaving the page. See Vera AI.
- Chat, notifications, and the megaphone — your team chat, everything that happened while you were away, and the "what's new" feed of recent platform changes.
- Org chip and account chip — switch organization (if you belong to more than one) and open your account menu.
The screens you will use most
Dashboard
Where: Workspace › Dashboard · /dashboard
Who: everyone
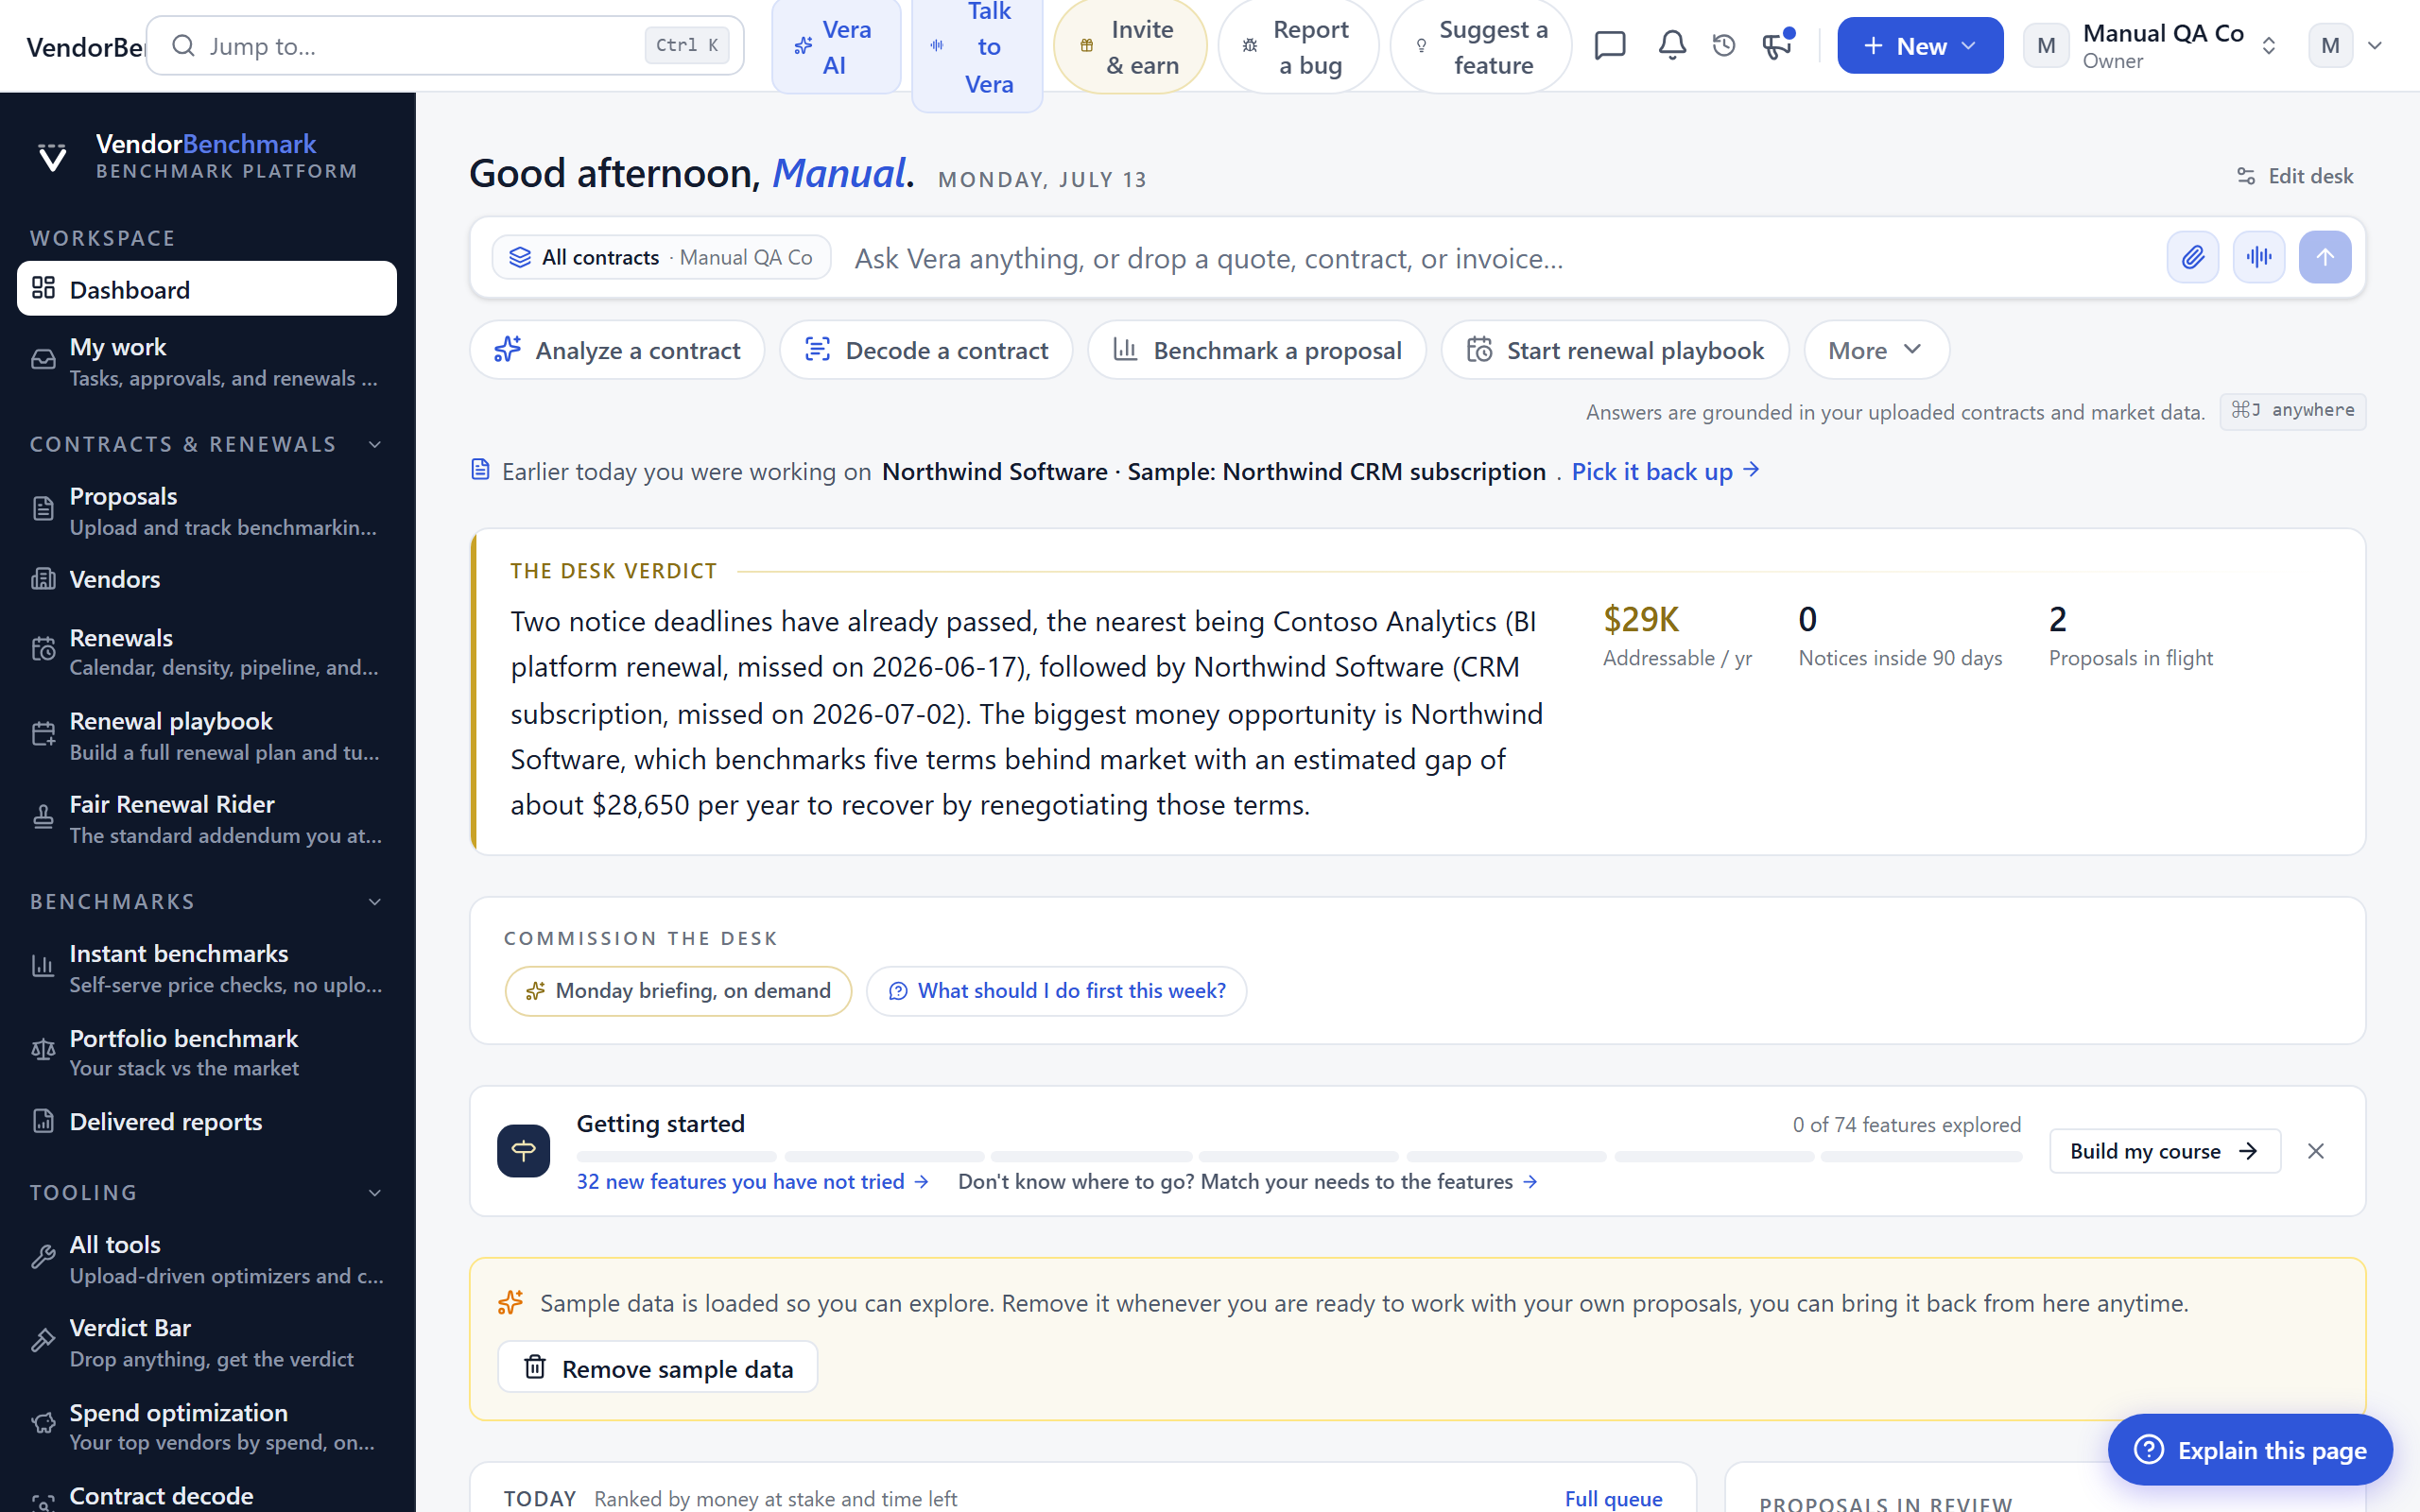
Your home page: everything in flight at a glance, from proposals being benchmarked to upcoming renewals and freshly delivered reports.
On the screen
- Setup checklist — your first steps on the platform. It disappears once you have completed them.
- Proposal cards — each benchmarking request and where it sits: Uploaded, In review, Benchmarked, or Delivered.
- Renewal alerts — agreements whose notice window opens soon, so you never miss a cancellation deadline.
- Your shortcuts — a band of the pages you pinned with the Add to dashboard button in the top bar, each one click away. It only appears once you have pinned at least one page. Remove a shortcut with the X on its tile, or with the top-bar button on the page itself.
- The toolkit — the ten most used desks, always here as a quick jumping-off band under your shortcuts.
- Sample data — new account? Load an example portfolio to explore, then remove it in one click. Sample rows never mix with your real data.
How to use it
- Work top to bottom: clear the checklist, then scan proposals in flight and renewals coming up.
- Use the Ask bar at the top of the dashboard to ask a question about your portfolio without navigating anywhere.
- As you find pages you return to often, click Add to dashboard in the top bar so they land in Your shortcuts.
Tips
- On a brand-new account, load sample data first so every screen has something to show while you explore. Remove it before you start entering real contracts.
- Pin the two or three desks you open every day (a benchmark, a playbook, the verdict bar) so they are always one click from the dashboard.
Getting started (the course)
Where: Account › Getting started · /start
Who: everyone
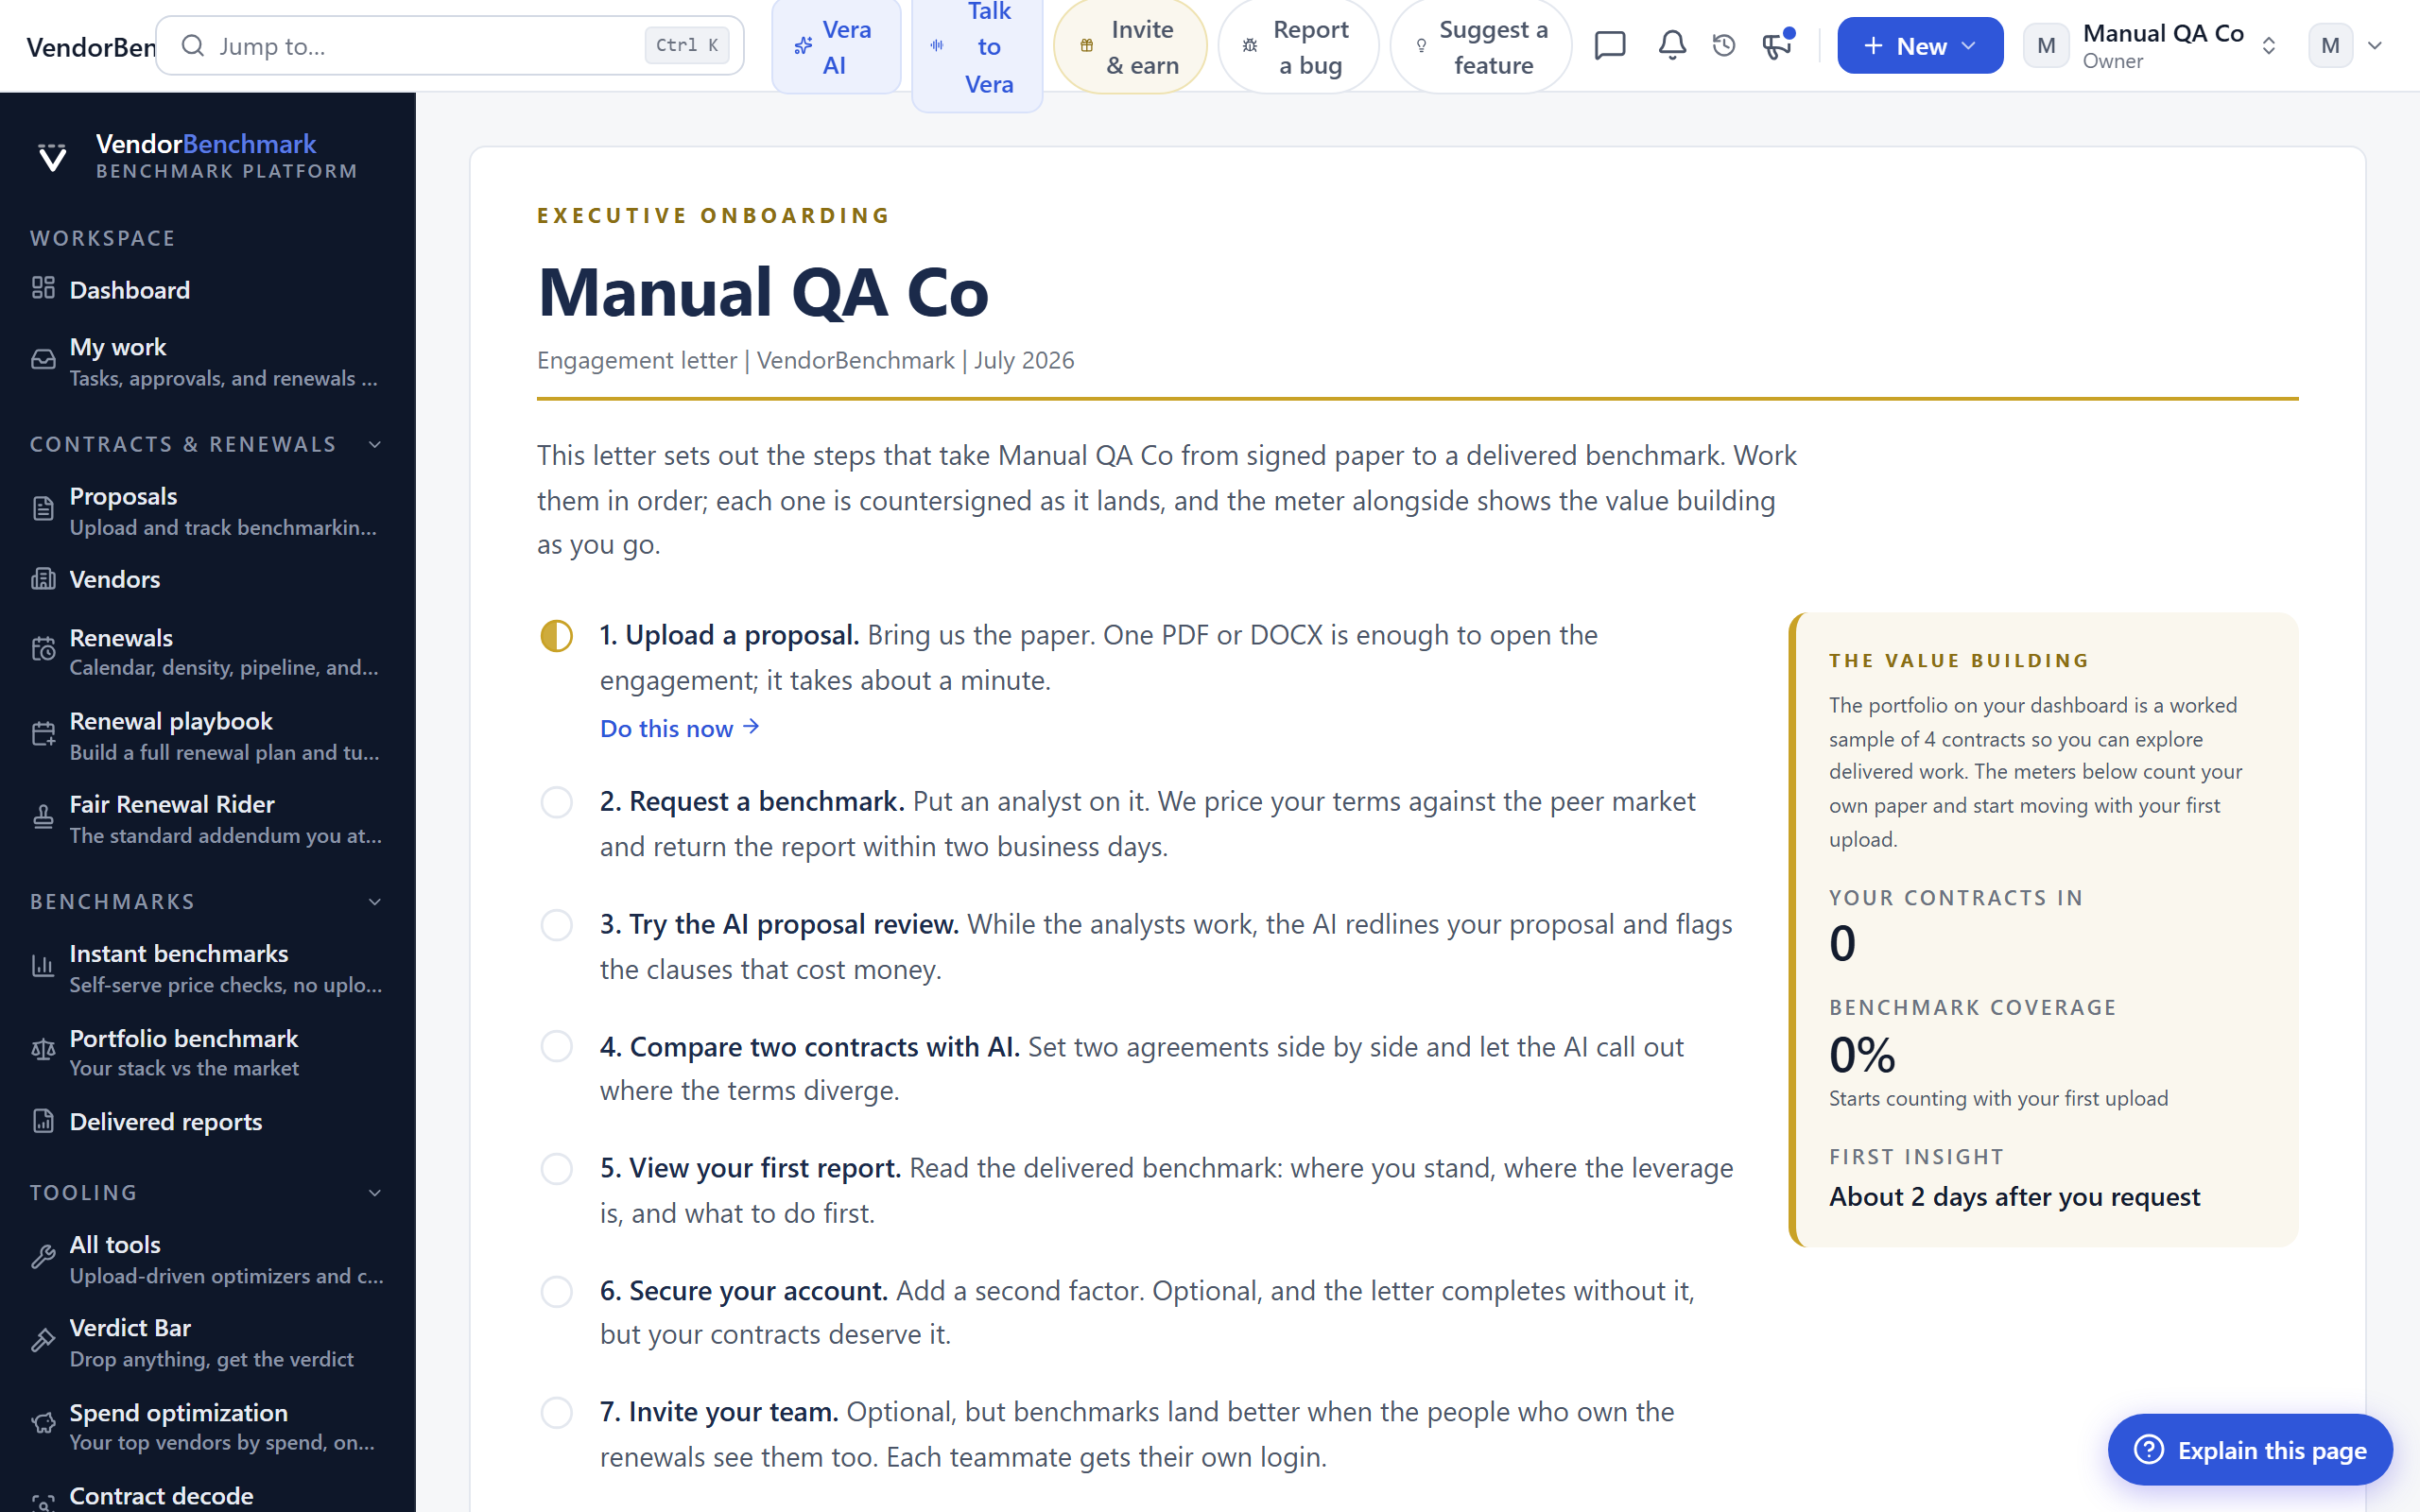
A guided tour matched to why you are here: benchmarking one contract, understanding a single contract, connecting your data sources, or running the full platform. Pick a path and tick steps off as you go; progress is saved to your account and syncs across your devices.
On the screen
- Four doors — benchmark one contract, understand a contract, connect your data, or run the full platform. Change paths anytime with Change path.
- Role and use-case questions — the full-platform path asks your role and what you want to get done, then builds a personal track from your answers.
- Progress path — the row of numbered dots shows your whole track: green dots are done, the blue one is your next step.
- Next up card — your single next step, promoted to the top with what you get out of it.
How to use it
- Pick the door that matches why you are here.
- Answer the role and use-case questions if prompted.
- Do the "Next up" step, then mark it done. Repeat down the track.
My work
Where: Workspace › My work · /my-work
Who: everyone
Everything assigned to you personally: tasks, renewals you own, and approvals waiting on you. This is your answer to "what needs me?"
On the screen
- Queues — your open items grouped by type, so you can clear them in one sitting.
How to use it
- Open My work at the start of the day and clear each queue.
- For team-wide to-dos rather than just yours, see Tasks.
The More catalog
Where: Workspace › More · /more
Who: everyone
The full, searchable catalog of every tool and page, including everything the short rail hides. When you cannot remember where something lives, this is the place to browse or search.
How to use it
- Open More and search, or browse by group.
- Faster still: press Ctrl/⌘ K anywhere and type what you want.
What's new
Where: top-bar megaphone · /whats-new
Who: everyone
Release notes in two levels: curated highlights in the feed, and the full changelog of every small change one click deeper. Each entry links to the feature it describes.